written by http://www.tutorialspoint.com/android/android_shared_preferences.htm
Android provides many ways of storing data of an application. One of this way is called Shared Preferences. Shared Preferences allow you to save and retrieve data in the form of key,value pair.
In order to use shared preferences , you have to call a method getSharedPreferences() that returns a SharedPreference instance pointing to the file that contains the values of preferences.
SharedPreferences sharedpreferences = getSharedPreferences(MyPREFERENCES, Context.MODE_PRIVATE);
The first parameter is the key and the second parameter is the MODE. Apart from private there are other modes available that are listed below:
| Sr.No | Mode and description |
|---|---|
| 1 | MODE_APPEND This will append the new preferences with the already existing preferences |
| 2 | MODE_ENABLE_WRITE_AHEAD_LOGGING Database open flag. When it is set , it would enable write ahead logging by default |
| 3 | MODE_MULTI_PROCESS This method will check for modification of preferences even if the sharedpreference instance has already been loaded |
| 4 | MODE_PRIVATE By setting this mode , the file can only be accessed using calling application |
| 5 | MODE_WORLD_READABLE This mode allow other application to read the preferences |
| 6 | MODE_WORLD_WRITEABLE This mode allow other application to write the preferences |
You can save something in the sharedpreferences by using SharedPreferences.Editor class. You will call the edit method of SharedPreference instance and will receive it in an editor object. Its syntax is −
Editor editor = sharedpreferences.edit();
editor.putString("key", "value");
editor.commit();
Apart from the putString method , there are methods available in the editor class that allows manipulation of data inside shared preferences. They are listed as follows:
| Sr. NO | Mode and description |
|---|---|
| 1 | apply() It is an abstract method. It will commit your changes back from editor to the sharedPreference object you are calling |
| 2 | clear() It will remove all values from the editor |
| 3 | remove(String key) It will remove the value whose key has been passed as a parameter |
| 4 | putLong(String key, long value) It will save a long value in a preference editor |
| 5 | putInt(String key, int value) It will save a integer value in a preference editor |
| 6 | putFloat(String key, float value) It will save a float value in a preference editor |
Example
This example demonstrates the use of the Shared Preferences. It display a screen with some text fields , whose value are saved when the application is closed and brought back when it is opened again .
To experiment with this example , you need to run this on an actual device on after developing the application according to the steps below:
| Steps | Description |
|---|---|
| 1 | You will use Android studio to create an Android application under a package com.example.sairamkrishna.myapplication. While creating this project, make sure you Target SDK and Compile With at the latest version of Android SDK to use higher levels of APIs. |
| 2 | Modify src/MainActivity.java file to add progress code to display the spinning progress dialog. |
| 3 | Modify res/layout/activity_main.xml file to add respective XML code. |
| 4 | Run the application and choose a running android device and install the application on it and verify the results. |
Following is the content of the modified MainActivity.java.
package com.example.sairamkrishna.myapplication;

import android.content.Context;
import android.content.SharedPreferences;
import android.support.v7.app.ActionBarActivity;
import android.os.Bundle;
import android.view.Menu;
import android.view.MenuItem;
import android.view.View;
import android.widget.Button;
import android.widget.EditText;
import android.widget.Toast;

public class MainActivity extends ActionBarActivity {
   EditText ed1,ed2,ed3;
   Button b1;
   public static final String MyPREFERENCES = "MyPrefs" ;
   public static final String Name = "nameKey";
   public static final String Phone = "phoneKey";
   public static final String Email = "emailKey";
   SharedPreferences sharedpreferences;

   @Override
   protected void onCreate(Bundle savedInstanceState) {
      super.onCreate(savedInstanceState);
      setContentView(R.layout.activity_main);

      ed1=(EditText)findViewById(R.id.editText);
      ed2=(EditText)findViewById(R.id.editText2);
      ed3=(EditText)findViewById(R.id.editText3);

      b1=(Button)findViewById(R.id.button);
      sharedpreferences = getSharedPreferences(MyPREFERENCES, Context.MODE_PRIVATE);

      b1.setOnClickListener(new View.OnClickListener() {
         @Override
         public void onClick(View v) {
            String n  = ed1.getText().toString();
            String ph  = ed2.getText().toString();
            String e  = ed3.getText().toString();

            SharedPreferences.Editor editor = sharedpreferences.edit();

            editor.putString(Name, n);
            editor.putString(Phone, ph);
            editor.putString(Email, e);
            editor.commit();
            Toast.makeText(MainActivity.this,"Thanks",Toast.LENGTH_LONG).show();
         }
      });
   }

   @Override
   public boolean onCreateOptionsMenu(Menu menu) {
      // Inflate the menu; this adds items to the action bar if it is present.
      getMenuInflater().inflate(R.menu.menu_main, menu);
      return true;
   }
   @Override
   public boolean onOptionsItemSelected(MenuItem item) {
      // Handle action bar item clicks here. The action bar will
      // automatically handle clicks on the Home/Up button, so long
      // as you specify a parent activity in AndroidManifest.xml.

      int id = item.getItemId();

      //noinspection SimplifiableIfStatement
      if (id == R.id.action_settings) {
         return true;
      }
      return super.onOptionsItemSelected(item);
   }
}
Following is the content of the modified main activity fileres/layout/activiy_main.xml.
<RelativeLayout xmlns:android="http://schemas.android.com/apk/res/android"
   xmlns:tools="http://schemas.android.com/tools" android:layout_width="match_parent"
   android:layout_height="match_parent" android:paddingLeft="@dimen/activity_horizontal_margin"
   android:paddingRight="@dimen/activity_horizontal_margin"
   android:paddingTop="@dimen/activity_vertical_margin"
   android:paddingBottom="@dimen/activity_vertical_margin" tools:context=".MainActivity">

   <TextView
      android:layout_width="wrap_content"
      android:layout_height="wrap_content"
      android:text="Shared Preference "
      android:id="@+id/textView"
      android:layout_alignParentTop="true"
      android:layout_centerHorizontal="true"
      android:textSize="35dp" />

   <TextView
      android:layout_width="wrap_content"
      android:layout_height="wrap_content"
      android:text="Tutorials Point"
      android:id="@+id/textView2"
      android:layout_below="@+id/textView"
      android:layout_centerHorizontal="true"
      android:textSize="35dp"
      android:textColor="#ff16ff01" />

   <EditText
      android:layout_width="wrap_content"
      android:layout_height="wrap_content"
      android:id="@+id/editText"
      android:layout_below="@+id/textView2"
      android:layout_marginTop="67dp"
      android:hint="Name"
      android:layout_alignParentRight="true"
      android:layout_alignParentEnd="true"
      android:layout_alignParentLeft="true"
      android:layout_alignParentStart="true" />

   <EditText
      android:layout_width="wrap_content"
      android:layout_height="wrap_content"
      android:id="@+id/editText2"
      android:layout_below="@+id/editText"
      android:layout_alignParentLeft="true"
      android:layout_alignParentStart="true"
      android:layout_alignParentRight="true"
      android:layout_alignParentEnd="true"
      android:hint="Pass" />

   <EditText
      android:layout_width="wrap_content"
      android:layout_height="wrap_content"
      android:id="@+id/editText3"
      android:layout_below="@+id/editText2"
      android:layout_alignParentLeft="true"
      android:layout_alignParentStart="true"
      android:layout_alignParentRight="true"
      android:layout_alignParentEnd="true"
      android:hint="Email" />

   <Button
      android:layout_width="wrap_content"
      android:layout_height="wrap_content"
      android:text="Save"
      android:id="@+id/button"
      android:layout_below="@+id/editText3"
      android:layout_centerHorizontal="true"
      android:layout_marginTop="50dp" />

</RelativeLayout>
Following is the content of the modified content of fileres/values/strings.xml.
<resources>
   <string name="app_name">My Application</string>
   <string name="hello_world">Hello world!</string>
   <string name="action_settings">Settings</string>
</resources>
Following is the content default file AndroidManifest.xml.
<?xml version="1.0" encoding="utf-8"?>
<manifest xmlns:android="http://schemas.android.com/apk/res/android"
   package="com.example.sairamkrishna.myapplication" >

   <application
      android:allowBackup="true"
      android:icon="@mipmap/ic_launcher"
      android:label="@string/app_name"
      android:theme="@style/AppTheme" >

      <activity
         android:name=".MainActivity"
         android:label="@string/app_name" >

         <intent-filter>
            <action android:name="android.intent.action.MAIN" />
            <category android:name="android.intent.category.LAUNCHER" />
         </intent-filter>

      </activity>

   </application>
</manifest>
Let's try to run your application. I assume you have connected your actual Android Mobile device with your computer. To run the app from Android studio, open one of your project's activity files and click Run  icon from the toolbar. Before starting your application, Android studio will display following window to select an option where you want to run your Android application.

Select your mobile device as an option and then check your mobile device which will display following screen −
Now just put in some text in the field. Like i put some random name and other information and click on save button.
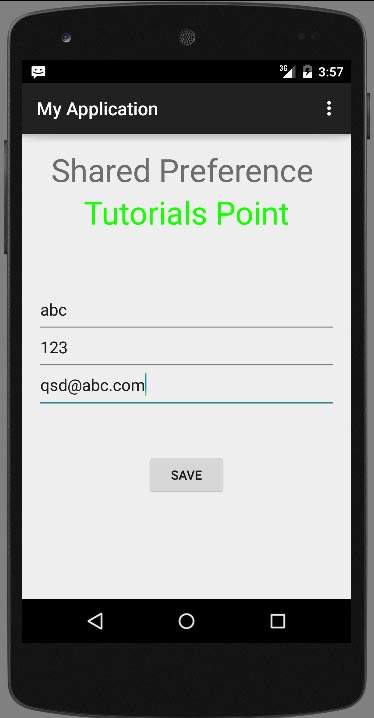
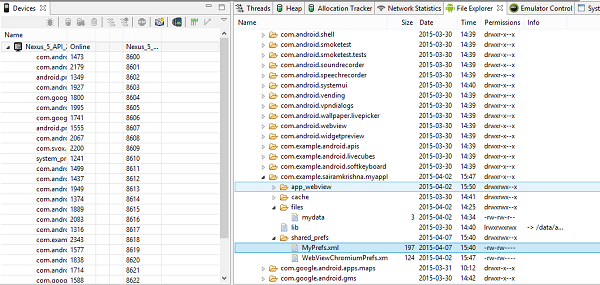
Now when you press save button , the text will be saved in the shared preferences. Now press back button and exit the application. Now open it again and you will see all the text you have written back in your application.
SharedPreference를 통하여 다른 애플리케이션과 데이타를 공유하기
SharedPreference는 생성할때 다른 애플리케이션의 접근을 허용하여 생성할 경우, 다른 애플리케이션이 그 데이타를 액세스 할 수 있다. 즉 SharedPreference 를 이용해서 애플리케이션간에 데이타를 공유하는 것이 가능하다.
다음은, 타 애플리케이션의 SharedPreference로 부터 데이타를 읽어와서 EditText에 출력하는 예제의 실행예와 코드이다.

public void readPreference(View view) throws Exception {
// get Context of other application
Context otherAppContext = null;
try{
otherAppContext =
createPackageContext("com.example.terry.sharedpreferencewriter",0);
}catch(PackageManager.NameNotFoundException e){
// log
e.printStackTrace();
throw e;
}
// getting Shared preference from other application
SharedPreferences pref
= otherAppContext.getSharedPreferences("MYPREFRENCE", Context.MODE_WORLD_READABLE | Context.MODE_MULTI_PROCESS);
String value = pref.getString("MYKEY", "NOTFOUND");
EditText txtValue = (EditText)findViewById(R.id.txtValue);
txtValue.setText(value);
}
먼저 createPcakgeContext라는 메서드를 이용하여 다른 애플리케이션인 “com.example.terry.sharedpreferencewriter” 에 대한 애플리케이션 Context를 읽어온다.
다음으로는 얻어온 Context로 부터 getSharedPreferences 메서드를 읽어온후에, 해당 SharedPreference로 부터 getString 메서드를 이용하여 “MYKEY” 라는 키로 저장된 값을 읽어와서 출력한다.
import android.content.Context;
import android.content.SharedPreferences;
import android.content.SharedPreferences.Editor;

/**
 */
public class SharedPreferenceUtil {

    public static final String PREFS_NAME = "AOP_PREFS";
    public static final String PREFS_KEY = "AOP_PREFS_String";

    public SharedPreferenceUtil() {
        super();
    }

    public void save(Context context, String text) {
        SharedPreferences settings;
        Editor editor;

        //settings = PreferenceManager.getDefaultSharedPreferences(context);
        settings = context.getSharedPreferences(PREFS_NAME, Context.MODE_PRIVATE); //1
        editor = settings.edit(); //2

        editor.putString(PREFS_KEY, text); //3

        editor.commit(); //4
    }


    public String getValue(Context context) {
        SharedPreferences settings;
        String text;

        //settings = PreferenceManager.getDefaultSharedPreferences(context);
        settings = context.getSharedPreferences(PREFS_NAME, Context.MODE_PRIVATE);
        text = settings.getString(PREFS_KEY, null);
        return text;
    }

    public void clearSharedPreference(Context context) {
        SharedPreferences settings;
        Editor editor;

        //settings = PreferenceManager.getDefaultSharedPreferences(context);
        settings = context.getSharedPreferences(PREFS_NAME, Context.MODE_PRIVATE);
        editor = settings.edit();

        editor.clear();
        editor.commit();
    }

    public void removeValue(Context context) {
        SharedPreferences settings;
        Editor editor;

        settings = context.getSharedPreferences(PREFS_NAME, Context.MODE_PRIVATE);
        editor = settings.edit();

        editor.remove(PREFS_KEY);
        editor.commit();
    }


}
'모바일개발(Mobile Dev) > 안드로이드개발(Android)' 카테고리의 다른 글
| android session mgmt (0) | 2016.08.13 |
|---|---|
| ListView SimpleAdapter (0) | 2016.08.13 |
| how to make material design navigation drawer with header view android (0) | 2016.08.07 |
| android v4 v7 (0) | 2016.08.06 |
| android studio + nox (offline) (0) | 2016.07.26 |